Showing posts with label Babies and Children. Show all posts

Saturday, December 26, 2020

Baby Bear Washcloth


One of the things I love to give to new moms is a set of baby washcloths.  I searched for a fun shaped washcloth but didn't find what I wanted so I decided to play around and see if I could create something fun.  This is just what I had in mind!  The variety of stitches creates a fun texture and the addition of the ears turns a drab washcloth into something fun!  

Be sure to read all the way to the bottom of the post for several variations.  I've included a variation that uses all double crochet if you want to skip the herringbone stitches.

If you are interested in square baby washcloths check out Tub Time Trio 2 and Tub Time Trio.    

Add to your Ravelry Queue 

Pin on Pinterest 


Yarn: 

18 - 21 yards of I Love This Cotton or any weight 4 Cotton Yarn

Hook: H


Abbreviations:

ch = chain

sl-st = slip stitch

dc = double crochet

her-dc = herringbone double crochet

hhdc = herringbone half double crochet

sts = stitches

tr = triple crochet

blo = back loop only


Note: Chain stitches do not count as a stitch.


Basic One Color Bear Washcloth Pattern:

R1: ch four, sl-st to join, ch 2, 13 dc into circle, sl-st to join. (Or use a magic circle to start.) (13 stitches)

R2: ch 3, 2 her-dc in each stitch, sl-st to join (26 stitches)

R3: ch 2, 2 dc in stitch, 1 dc in next [2dc in next, 1 dc in next] repeat around. Sl st to join (39 stitches)

R4: ch 2, 2hhdc, 1 hhdc in next 2 [2 hhdc in next, 1 hhdc in next 2] repeat around, sl-st to join (52 stitches)

R5: ch 1, sk 2 sts, 9 tr in next, sk 2 sts, sl-st in next 6, sk 2 sts, 9 tr in next, sk 2 sts, sl-st around.


Variation: Outline

Follow the instructions above for R1, R2, R3, R4.  Switch to Outline color for R5.


Variation: Blue

R1, R4, R5 in color 1 (blue)

R2, R3 in color 2 (tan)


Variation: Double Crochet Pink 1

Color 1 R1, R5 (pink)

Color 2 R2, R3, R4 (tan)

R1: Ch four, sl-st to join, ch 2, 13 dc into circle, sl-st to join. (Or use magic circle to start.) (13 stitches)

R2: ch 3, 2 dc blo in each stitch, sl-st to join (26 stitches)

R3: ch 2, 2 dc in stitch, 1 dc in next [2dc in next, 1 dc in next] repeat around. Sl st to join (39 stitches)

R4: ch 2, 2dc, 1 dc in next 2 [2 dc in next, 1 dc in next 2] repeat around, sl-st to join (52 stitches)

R5: ch 1, sk 2 sts, 9 tr in next, sk 2 sts, sl-st in next 6, sk 2 sts, 9 tr in next, sk 2 sts, sl-st around.


Variation Double Crochet Pink Outline 2:

Follow the pink variation above with the following changes.  R1-R5 in tan.  R2 regular dc not blo

R6: sl-st outline around in pink


Email: grandmaduckdesigns@gmail.com

Pinterest: Grandma Duck Designs
Raverly: Grandma Duck Designs
Instagram: Grandma Duck Designs
Facebook: Grandma Duck Designs


Happy Crafting
๐Ÿงก Grandma Duck ๐Ÿงก

Don't miss any upcoming free patterns!
Subscribe to Grandma Duck Designs by Email

This pattern is for personal use only. It cannot be sold, redistributed, or edited in any way.
Copyright 2020, Grandma Duck Designs


Monday, October 19, 2020

Grape Lemonade Baby Blanket


This fun baby blanket has it all!  It is beautifully textured, uses soft yarn, and is easy to make.  Oh, and did I mention that it is also quick?  This blanket was completed in about 8-10 hours!  

I have again used one of my all-time favorite stitches, Lemon Peel.  If you love the lemon peel stitch as much as I do, check out the Lumpy Lemonade Dishcloth or the Northern Lights Winter Scarf.  


Ravelry and Pinterest links coming soon.   

Supplies:
Bernat Baby Blanket main color: approximately 430 yards (six 3.5 oz skeins)
Bernat Baby Blanket Yarn, stripe and border: approximately 100-120 yards
12mm hook
Yarn Needle
Scissors
Stitch Markers

Abbreviations:


ch = chain
sl-st = slip stitch
sc = single crochet
dc = double crochet
st = stitch
sts = stitches
ch-sp = chain space
hk = hook

Finished size = 35" x 38"

Notes:
  • Chain stitches do not count as a stitch
  • I used a 12mm hook, but I crochet tightly.  If you crochet loose, consider dropping down a hook size.
  • Gauge is not important.
  • Mark your ch-sp in each corner with a stitch marker.  This makes it easier to find!
  • To adjust the size of your blanket, start with an odd number of chains.  

Instructions:

Blanket:

With main color ch 61
Row 1: sc in 2nd ch from hk and in each ch across (60 sts)
Row 2: sc in first st [dc in next, sc in next] repeat, hdc in last st, ch 1
Rows 3-5; repeat row 2

Switch to color 2:
Rows 6-9: repeat row 2

Switch to main color:
Rows 10-13: repeat row 2

Switch to color 2:
Rows 14-17: repeat row 2

Switch to main color:
Rows 18 - 55: repeat row 2.  

Border : 
Switch to color 2
Round 1: ch 1, sc in each stitch around, place [sc-ch-sc] at each corner, sl-st to join; 
Round 2 - 3: repeat round 1 placing [sc-ch-sc] in the ch-sp from the previous round.  

If you make a blanket, please tag me on social media or share a photo with me in the comments.  I love seeing my designs come to life!


Email: grandmaduckdesigns@gmail.com
Pinterest: Grandma Duck Designs
Raverly: Grandma Duck Designs
Instagram: Grandma Duck Designs
Facebook: Grandma Duck Designs


Happy Crafting
๐Ÿงก Grandma Duck ๐Ÿงก

Don't miss any upcoming free patterns!
Subscribe to Grandma Duck Designs by Email

This pattern is for personal use only. It cannot be sold, redistributed, or edited in any way.
Copyright 2020, Grandma Duck Designs

Monday, September 9, 2019

Latticed Lullaby Baby Blanket


This blanket has everything that I love in a crochet pattern.  It's quick, it's easy and it's beautiful!  I can't wait for the next baby shower to give it to a little one.

Do you want to hear something crazy?  Just over two years ago, I was afraid to try new stitches but now I just pick up a hook and start crocheting.  Sometimes I have an idea in mind, sometimes I just see what happens.

This project is one that I had been thinking about for a while.  I use this same stitch to make one of my favorite dishcloths.  I wondered how it would look in a bulky yarn as a baby blanket.  It was a successful experiment!  I have another idea in mind for this stitch, so stay tuned!

Below you can see a close up of the beautiful texture in the blanket.  You can also see the results of me goofing around on a day that was too hot to crochet.


Close-up of the stitches.


Add this pattern to your Ravelry Queue.
Pin this pattern on Pinterest.

Supplies:
Bernat Blanket Yarn - 500 yards,  21 ounces
Crochet hook size N
Yarn Needle

Stitches:
Chain = ch
Single Crochet = sc
Chain Space = ch-sp

Pattern: Latticed Lullaby Baby Blanket

Chain 64

Row 1: sc in the 4th ch from the hook, (ch2, skip one ch, sc in next) repeat across row, turn.

Row 2: ch 3, sc in the 1st ch-sp, ch 2 (sc in next ch-sp, ch 2) repeat across row, sc in last ch-sp, turn.

Repeat row 2 until the desired size.

Finished size:34" x38"
Crocheting in August can be HOT!
Happy Crafting
๐Ÿงก Grandma Duck ๐Ÿงก

Don't miss any fun free patterns! 
Subscribe to Grandma Duck Designs by Email

This pattern is for personal use only. 
It cannot be sold, redistributed, or edited in any way.
Copyright 2019, Grandma Duck Designs

Saturday, July 6, 2019

Quick and Thick Baby Blanket

What is soft, squishy and warm?  This blanket!  It would be perfect to cuddle a winter baby, for use with a car seat or on the floor for "tummy-time."

The variegated yarn was a gift from my mom.  Thanks Mom!  I just happened to have one skein of the cream color in my stash.  It was perfect for finishing the blanket.  I love it when the project comes together.

  This took me three days to make, crocheting sporadically.   (It was hot here and this blanket is warm.  I had to take  frequent breaks.) Blankets sure are quick when using bulky yarn!

I've been on a baby blanket kick recently so expect to see more baby blanket patterns soon.  I have another design in the works and have made several using other people's designs.  I just need to weave in ends and photograph the blankets.

Finished size: 31" x 34"

Supplies:
Bernat Baby Blanket Yarn: Little Petunias 6 - 3.5 ounce skeins
Bernat Baby Blanket Yarn: Vanilla 1 - 3.5 ounce skein
Crochet Hook Size N 10 mm
Yarn Needle
Stitch Marker

Stitches and Abbreviations:
Chain = ch
Double Crochet = dc
Single Crochet = sc
Stitch = st
Slip Stitch = sl st
Hook = hk

Pattern:
  • Chain 60
  • Row 1: sc in the second ch from hk and in each chain across
  • Row 2: sc & dc in the first st, skip one st (sc & dc in the next st, skip one st) repeat across, sc in last st, ch 1, turn
  • Repeat row 2 until desired size.
Border:
  • Round 1: Join border color in any sc on the top edge.  ch 1, sc in same stitch, mark first sc with a stitch marker. sc in each st around blanket, placing 3 sc in each corner.  On the sides, place on sc in the side of each sc, and two sc in the side of each dc.  sl st to join.  Remove stitch marker
  • Round 2: ch 2, hdc in same stitch, mark the first hdc with a stitch marker, hdc in each st around blanket, placing a hdc, ch 1, hdc in each corner.  sl st to join.  
Note:  To increase or decrease the size of this blanket, start with an even number of chains.

Pin this pattern on Pinterest
Place this pattern in your Ravelry Queue


Happy Stitching!
๐Ÿ’— Grandma Duck ๐Ÿ’—


Sunday, June 30, 2019

Simple Blanket: Bulky Yarn


A few years ago, I picked up seven skeins of Bernat Baby Blanket yarn in Pink Twist.  You just can't pass up a Black Friday yarn deal, right?  My granddaughter loves pink, so I thought I"d make her a new blanket for her birthday.  I ended up ordering 3 additional skeins to get the size I wanted.

This was my first time crocheting with Bernat Baby Blanket yarn.  It was so easy to work with!  The little girl might just get a matching hat with the bits I have left over.

Finished size 56" X 46"

Pink Twist Yarn
  
Materials Needed:
10 skeins of Bernat Baby Blanket yarn Pink Twist (small skeins)
1 skein of Bernat Blanket yarn white for the border
Size Q hook
Yarn needle for weaving in ends

Pattern:
Chain 76
Row 1: SC in second ch from hook, SC in each ch across
Row 2: CH 1, turn, SC in each stitch across
Repeat Row 2 until desired length

Border:
 Using white, SC in each st around all four sides, placing 3 SC at each corner.  Slip stitch to join, chain one, repeat border row for a total of two rounds.

Friday, June 14, 2019

Shell Stitch Baby Blanket


So, a little secret.  I have more than one WIP.  I know, shocking right?  One of my goals for the year was to finish all the baby blanket WIPs that I have.  This one is the first one knocked off the list.  Two more to go....or....erm.....three since I started another yesterday.  This little beauty is now in my pile of blankets waiting to gift to a baby. 

I was trying to figure out when I started this one; the closest guestimate is 2002.  Seventeen years.  Gulp!  The good news (I guess) is that the remaining WIPs are all less than a year old. 

My mother-in-law always used this stitch to make baby blankets for her grandchildren.  I loved her blankets and set out to replicate the stitch. 

Shell Stitch Baby Blanket
Size 4 Yarn - Approximately 1,000 yards (750 of color 1, 250 of color 2)
Crochet Hook size I

Using color 1 - chain 79
Row 1: 2dc in the 4th ch from hk, *sk 2 ch, 1sc in next ch, sk 2 ch, 5dc in next ch* repeat until 3ch, sc in last ch

Row 2: ch 3, turn, 2dc in the sc in previous row, *sk 2 dc, sc in next st, sk 2 dc, 5 dc into sc from previous row* repeat until the end of the row.

Row 3-12: Repeat row 2
Row 13-16: change to color 2, repeat row 2
Row 17-28: change to color 1, repeat row 2
Row 29-32: change to color 2, repeat row 2
Row 33-44: change to color 1, repeat row 2
Row 45-48: change to color 2, repeat row 2
Row 51-60: change to color 1, repeat row 2

For border:
Row 1: ch 1, turn, sc around all four sides of the blanket with 3 sc in each corner.  I did a hdc in the sc along the top edge to straighten the row. 

Row 2, ch 1, sc around all four sides of the blanket placing 3 sc in each corner, fasten off.  Weave in ends.


Wednesday, May 29, 2019

Crib or Toddle Bed Sheets: Easy Sewing Project

One of the things I wish I had done several years earlier was to create sheet sets for my Duckling.  I never even thought of making crib sheets.  (Silly me!)  When she moved to a toddler bed, I wanted to make her something fun for her "big girl"  bed.  After research, I found this great pattern.

How cute is this bed?  The chevrons and turtles are colorful and fun!  When she first saw her new sheet and pillowcase, she squealed and rolled around on the bed.  Nothing better than watching her eyes light up when I make something for her.  

Pattern:
How to Make a Crib Sheet

Supplies:
2 yards 45" wide fabric
2 yards 1/4" elastic
Basic sewing supplies

If you want to coordinate a pillowcase and sheet set similar to what is pictured, you'll need 2 1/4 yard of fabric for the sheet and pillow trim and 3/4 yard of a coordinating fabric.  

The tutorial for the sheet is well written with lots of pictures to make it easy to follow along.

The pillowcase pattern was shared in a previous blog post.

Pin this on Pinterest.

Happy Crafting!
๐Ÿ’— Grandma Duck ๐Ÿ’—


Pillowcases: Easy Sewing Project

With high school graduations just around the corner, I thought I'd share one of my favorite projects to give to teens that are headed off to college.  I've made dozens of these pillowcases.  Just before graduation, I made the pillowcase seen on the right for my son and his best friend. (Sorry about the poor quality of the photo!)   It gave me a small measure of comfort to know that after 18 years of being best buddies, they would have matching pillowcases to sleep on while away at college.  It's the little things, right?  Both of the boys loved the fabric - crazy monsters riding on rollercoasters.  

Supplies:
3/4 yard of cotton fabric 
1/4 yard of coordinating cotton fabric
Thread
Sewing machine
Rotary cutter and supplies (or scissors)


I've made these pillowcases not only for grads but for children and adults too.  Pictured above and to the right is an assortment of pillowcases made and donated to friends of mine who are a foster care family.  Each of the precious children in their care gets to pick a pillowcase when they arrive and take it with them when they leave.  I've heard back that the children really love having something that is just for them, especially at bedtime.  Pictured below is a pillowcase I made for a dear friend of mine.


Happy Crafting!
๐Ÿ’— Grandma Duck ๐Ÿ’—

Sunday, May 26, 2019

Tub Time Trio, Set 2

Tub Time Trio #4: HHDC 
Since writing the pattern for my first set of Tub Time Trio baby washcloths, I've made several sets for baby gifts. Recently, I tried the Herringbone Half Double Crochet stitch. Ooooooooo! I really like it! (Expect to see it again soon in a few upcoming patterns.) I thought that it would be a perfect stitch for a baby washcloth, which set me on a journey to find two more washcloth textures for another set of Tub Time Trio Baby Washcloths.

I recently published a Suzette Stitch Dishcloth pattern. So I downsized the pattern to baby washcloth size and added a beginning row and ending row of single crochet.

Next was to find a third textured stitch to complete the trio. I tried Moss Stitch, but wasn't thrilled with the results. I thought about using the Sedge stitch, but decided it was too similar in feel to the Suzette stitch. I skimmed over my list of stitches that I want to try and decided to test the Crunch Stitch. Yes! That was the perfect stitch to complete my trio.

New moms will love these soft washcloths for giving babies baths or washing sweet little faces. There are now six washcloths patterns sized just for little ones. If you make a washcloth, I'd love to see a picture in the comments/

Supplies:
1 skein of I Love This Cotton yarn 
H size crochet hook
yarn needle 
Scissors

Stitches and Abbreviations:
CH = Chain
SC = Single Crochet
HHDC = Herringbone Half Double Crochet
DC = Double Crochet
HDC = Half Double Crochet
SL ST = Slip Stitch
ST = Stitch

Special Stitches:
Instructions for the HHDC can be found here: Herringbone Half Double Crochet

Finished size about 5.5 square inches each.

Tub Time Trio #4: Herringbone Half Double Crochet Washcloth
Uses approximately 30 yards

Chain 21
Row 1: SC in 2nd CH from Hook and in each CH across. (20 stitches)
Row 2: CH 1, turn, HHDC in first ST, HHDC in each stitch across (20 stitches)
Row 3-15: Repeat Row 2
Row 16: CH 1, turn, SC in first ST, SC in each stitch across

For the striped washcloth, change color every two rows.
  

Tub Time Trio #5: Suzette Stitch Washcloth
Uses approximately 30 yards

Chain 22
Row 1: SC in 2nd CH from hook, SC across row (21 stitches)
Row 2: CH 1, Turn, SC & DC in the first ST skip one ST, (SC & DC in next, skip one ST) repeat across, SC in last st (21 stitches)
Row 3-18: Repeat Row 2
Row 19: SC in each ST across


Tub Time Trio #6: Crunch Stitch Washcloth
Uses approximately 35 yards

Chain 23
Row 1: SC in 2nd CH from hook, SC across row (22 stitches)
Row 2: HDC in the first ST, SL ST in the next [*HDC in the next ST, SL ST in the next*] Repeat across row (11 HDC, 11 SL ST)
Row 3-22: Repeat Row 2
Row 23: SC in each ST across


One skein of I Love This cotton was enough to make two Herringbone Half Double Crochet, two Suzette, and two Crunch Stitch washcloths. I probably had enough yarn to make both HHDC washcloths out of the same yarn, but I wanted to see how stripes would look.

Put this pattern in your Ravelry Queue
Pin this pattern on Pinterest

Happy Crafting!
๐Ÿ’— Grandma Duck ๐Ÿ’—

"Sometimes the littlest things take up the most room in your heart." --Winnie the Pooh

Sunday, May 12, 2019

Little Girl Purse

What is a nearly universal truth about little girls?  They LOVE having purses, bags, containers to carry around or store their "treasures."  (I feel like this is a truth for most grown-up little girls as well.)  

This little purse was fun to make.  I let duckling pick out both the fabric and the button.  I think she did a great job!  It is perfectly sized for toddlers through early elementary age.  Finished size is about 5" x 8".  This morning she used this purse to carry around puppies. 

The next one I make, I will increase the length of the strap so that it could also be used as a cross body bag.  


The tutorial: Little Girl Pleated Purse is easy to follow.  The only thing I would do differently next time is to use the recommended interfacing.  The stuff that I had on hand was too stiff and hard to work with.  

Pin this Pattern on Pinterest


     Happy Crafting!
    ๐Ÿ’— Grandma Duck ๐Ÿ’—


Thursday, March 7, 2019

Easy Knitted Baby Blanket


I am not a very good knitter.  There, I've said it.  But despite that fact, I love to knit.   I learned to knit from my mother when I was in grade school.  Since my mom is left handed and I'm right-handed, it was a challenge for both of us.  She's a fabulous knitter!  I have a whole drawer full of her hand-knit socks.  I knit mostly blankets, dishcloths, and scarves using simple patterns.

Pictured above is one of my favorite knitting projects.  I've made about a dozen of these over the years.  The pattern is easy.  You only need to pay attention to the first few stitches in each row and then it is mindless knitting across the blanket.  This is a perfect project for car trips or while watching a movie.  

The blue/green blanket, pictured, is made using Bernat Baby Blanket yarn.  The pink blanket is knit with Red Heart Baby Clouds.  Unfortunately, the Baby Clouds yarn is now discontinued.  

The blankets are knit on the diagonal.  Repeat the increase row until the blanket is the desired size.  I make mine about 36" square.  Each blanket takes me about 40 hours to complete.  I often make a matching baby hat with leftover yarn using the Knifty Knitter.  Perfect baby gifts!

Supplies:
Yarn: Boucle for a summer weight blanket or a Chunky baby yarn such as Bernat Baby Blanket
Circular knitting needles, an appropriate size for the yarn weight
Tapestry needle
Scissors
Blue & Pink: Red Heart Baby Clouds Yarn 
The bottom blanket is knit with boucle yarn.
If you are familiar with the Grandmother's favorite dishcloth pattern, this is the same thing only upsized with thicker yarn and sized to wrap a baby. 

Pattern:
Increase:
Cast on 4 stitches
Row 1: Knit across row
Increase Row: Knit 2, yarn over, knit across row.
Repeat row 2 until the blanket is the desired size

Decrease:
Once the blanket is the desired size, use the following to decrease by one stitch each row.
Decrease Row: Knit 1, knit 2 together, yarn over, knit 2 together, knit across.
Repeat decrease row until 3 stitches remain.  Cast off.
    Weave in ends and trim off excess yarn.

    Place this in your Ravelry Queue

    Another blanket using Bernat Baby Blanket Yarn
     Happy Crafting!
    ๐Ÿ’— Grandma Duck ๐Ÿ’—

    Thursday, February 28, 2019

    Flannel Burp Cloths: Quick Sewing Project


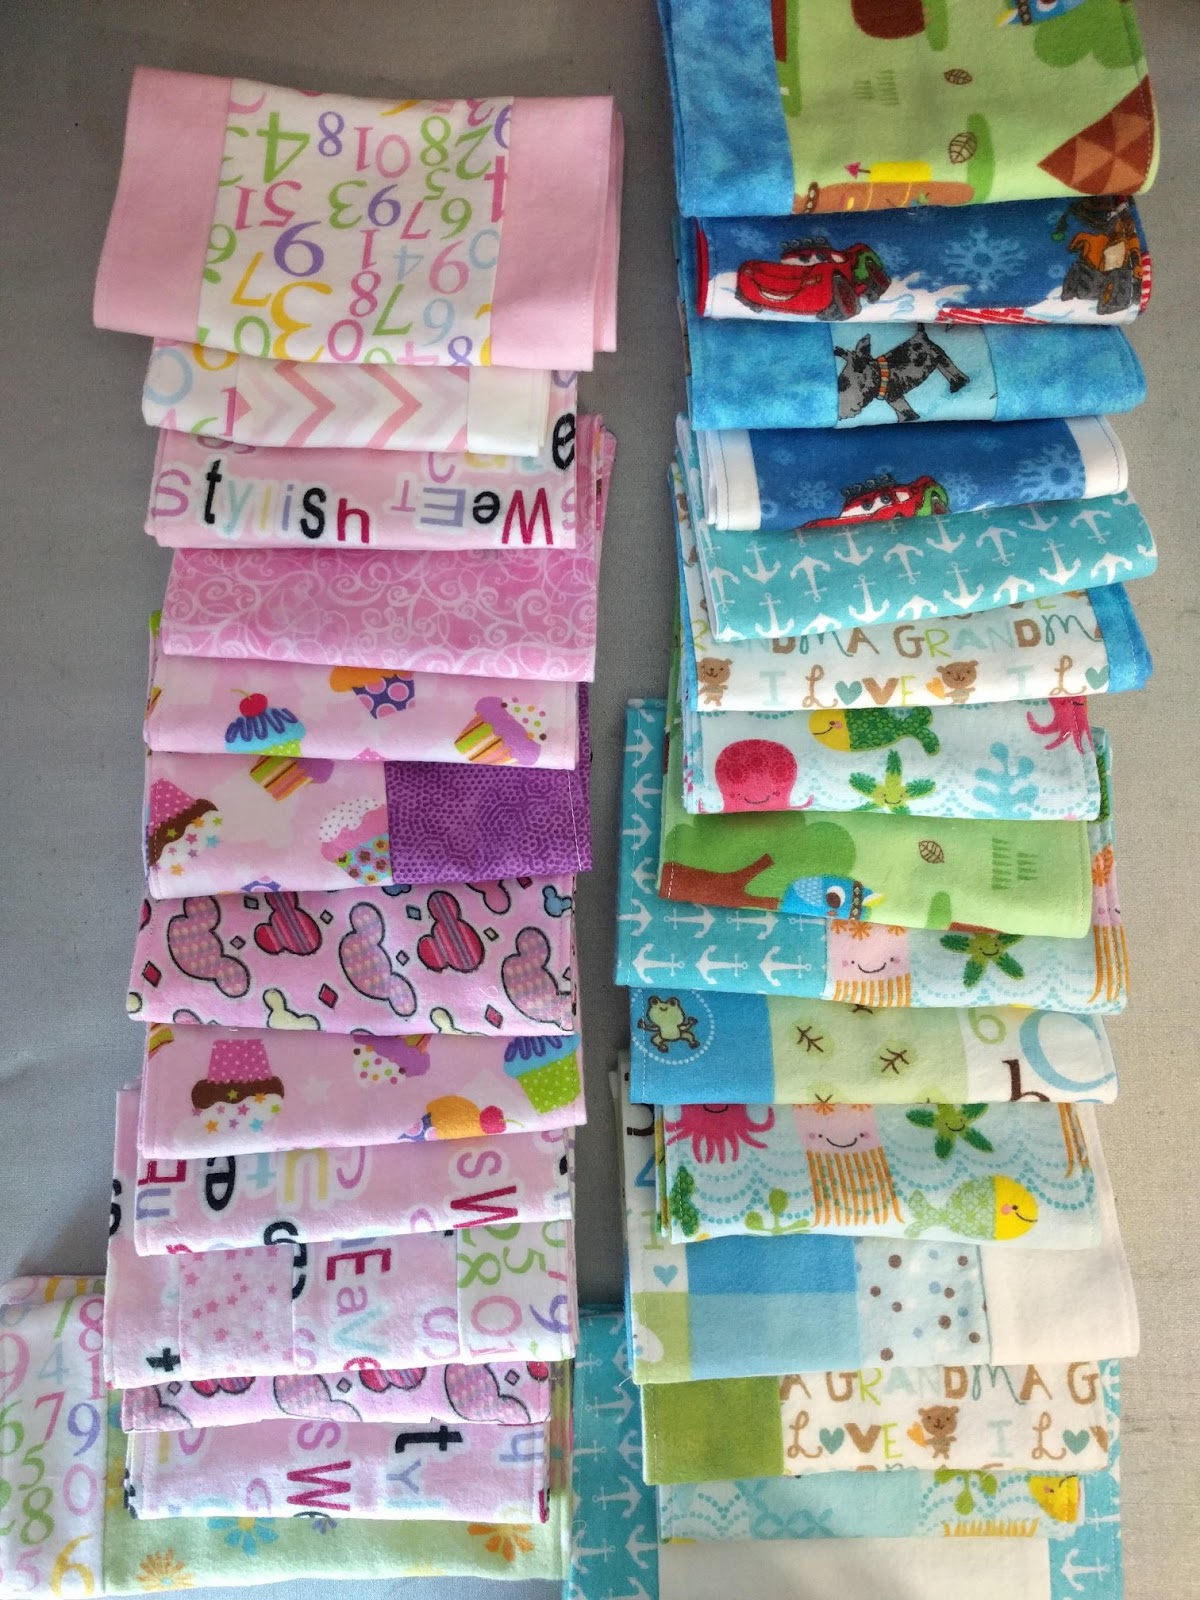
    What do you do with extra bits of flannel?  I make burp cloths!  These are all made from scraps that were either given to me or leftover from other projects.  This pattern is super flexible:  you can make rounded corners, add rick-rack, change the width or length.  Commercially made burp cloths tend to be around five to six inches wide and fifteen to eighteen inches long so that's around the size I make.   I did make some extra wide to use as changing pads for those times when I had to use a public changing table for my duckling.  
    I typically make 2-3 dozen at a time
      
    Basic Instructions:
    1. Cut or piece fronts and backs to be roughly 6-7" x 18".  
    2. With right sides together, sew all the way around the outside edges using 1/4 inch seam.  Leave a four-inch opening to turn.  
    3. Turn right sides out making sure to push the corners out.  
    4. Pin the opening closed.  Top stitch around the outside with 1/8 inch seam, making sure to catch both sides of the opening.  
    To Make Rounded Corners: Use a dinner plate or other large circle to round the corners.  Sew as above. 
      
    To Add Rick-Rack Edging: Complete step one above.  Using a 1/8" seam, sew the rick-rack to the front side of the burp cloth, lining the rick rack up with the outside edge and nothing hanging over.  Proceed with steps two, three and four above.
     Happy Crafting!
    ๐Ÿ’— Grandma Duck ๐Ÿ’—

    Saturday, February 23, 2019

    Poncho Vest - Pattern Alteration

    One of my challenges for this year was to make some sort of sweater, top, poncho, or shawl for either myself or my granddaughter. 

    I started with the fabulous Misty Morning Poncho Top pattern.  I then altered it to fit from adult to little girl size.  Some of you are going to cringe, but one of my favorite parts of crocheting, knitting, quilting, and sewing is using my math teacher skills to alter patterns.  In this case, it was a simple ratio problem to figure out a starting chain to fit my duckling.

    Once I completed the two panels, it was time to try it on.  I used stitch markers as "pins" to hold the pieces together so that I could figure out how long of seams I needed for the front, back and sides.  It was at this point that she decided that she did not want a seam up the front, but instead, she wanted button closures.  This made the poncho top into a poncho vest.  You can see in the pictures the fitting process with stitch markers.   It worked great! 


    After completing the back and side seams, our next step was to pick buttons.  After sewing on the buttons, I then slip stitched up the front, making loops of 9 slip stitches to form the closures.   Next, I added one row of single crochet and one row of half double crochet to the bottom edge before adding the fringe.  

    She loves how it turned out and is especially pleased that I let her help plan the project and make all the decisions.  I am in the process of making myself one of these poncho tops.

    Happy Crafting!
    ๐Ÿ’— Grandma Duck ๐Ÿ’—


    Friday, February 22, 2019

    Tub Time Trio: Baby Washcloths

    Are you looking for a fun and fast addition to a baby gift? New moms will love these soft washcloths for giving babies baths or washing sweet little faces.


    "Sometimes the littlest things take up the most room in your heart." --Winnie the Pooh

    Supplies:
    1 skein of cotton yarn 
    I used I Love This Cotton 205-Too Pink & 240-Delicate
    H size crochet hook
    yarn needle 
    Scissors


    Stitches and Abbreviations:
    SC = Single Crochet
    HDC = Half Double Crochet
    DC = Double Crochet
    CH = Chain
    ST = Stitch

    Finished size about 5" square each

    Tub Time Trio #1: Half Double Crochet Washcloth
    Uses approximately 25 yards
    Chain 20
    Row 1: SC in 2nd CH from Hook and in each CH across. (19 stitches)
    Row 2: CH 2, turn, HDC in first ST, HDC in each stitch across (19 stitches)
    Repeat Row 2 until the washcloth is square
      

    Tub Time Trio #2: Lemon Peel Washcloth
    Uses approximately 28 yards
    Chain 19
    Row 1: SC in 2nd CH from hook, DC in next, [*sc in next, dc in next] repeat across row (18 stitches - 9SC, 9DC)
    Row 2: CH 1, Turn, SC in first ST, DC in next, [*sc in next, dc in next] repeat across row (18 stitches - 9SC, 9DC)
    Repeat Row 2 until the washcloth is square
      

    Tub Time Trio #3: Textured Washcloth
    Uses approximately 36 yards
    Chain 26
    Row 1: SC in the 2nd CH from hook, HDC, 2DC in same chain, skip three chains [*SC, HDC, 2DC in next ch, skip three chains] repeat across, ending with 1SC in last CH (25 stitches - 7SC, 6HDC, 12DC)
    Row 2: CH 1, Turn, SC, HDC, 2DC in first stitch, skip three ST [*SC, HDC, 2DC in next ch, skip three chains] repeat across, ending with 1SC in last stitch (25 stitches - 7SC, 6HDC, 12DC)
    Repeat Row 2 until the washcloth is square
      

    One skein of I Love This cotton was enough to make two Half Double Crochet, two Lemon Peel, and one Textured washcloth.   

    Add this pattern to your favorites on Ravelry.
    Pin this pattern on Pinterest

    Happy Crafting!
    ๐Ÿ’— Grandma Duck ๐Ÿ’—