Showing posts with label Grandma Duck Design Original. Show all posts

Wednesday, July 6, 2022

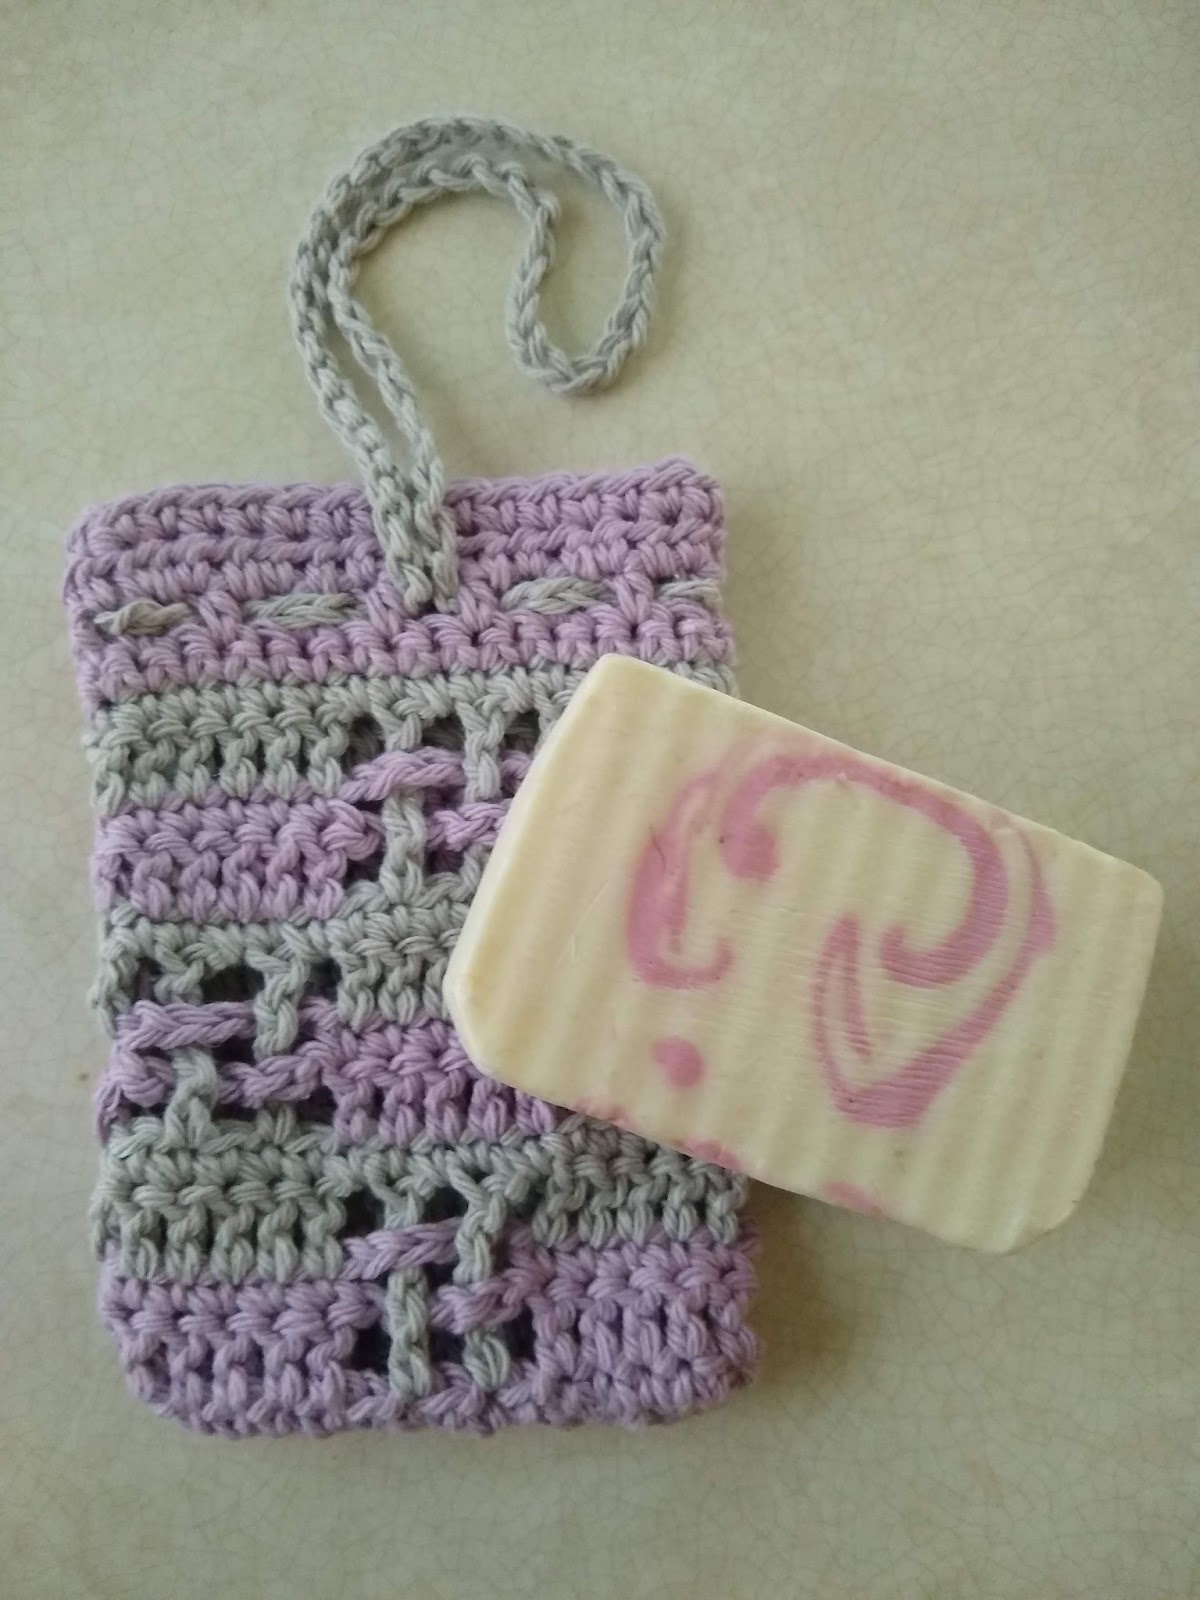
Double Dutch Soap Sack

Double Dutch

Extra Large Soap Sack


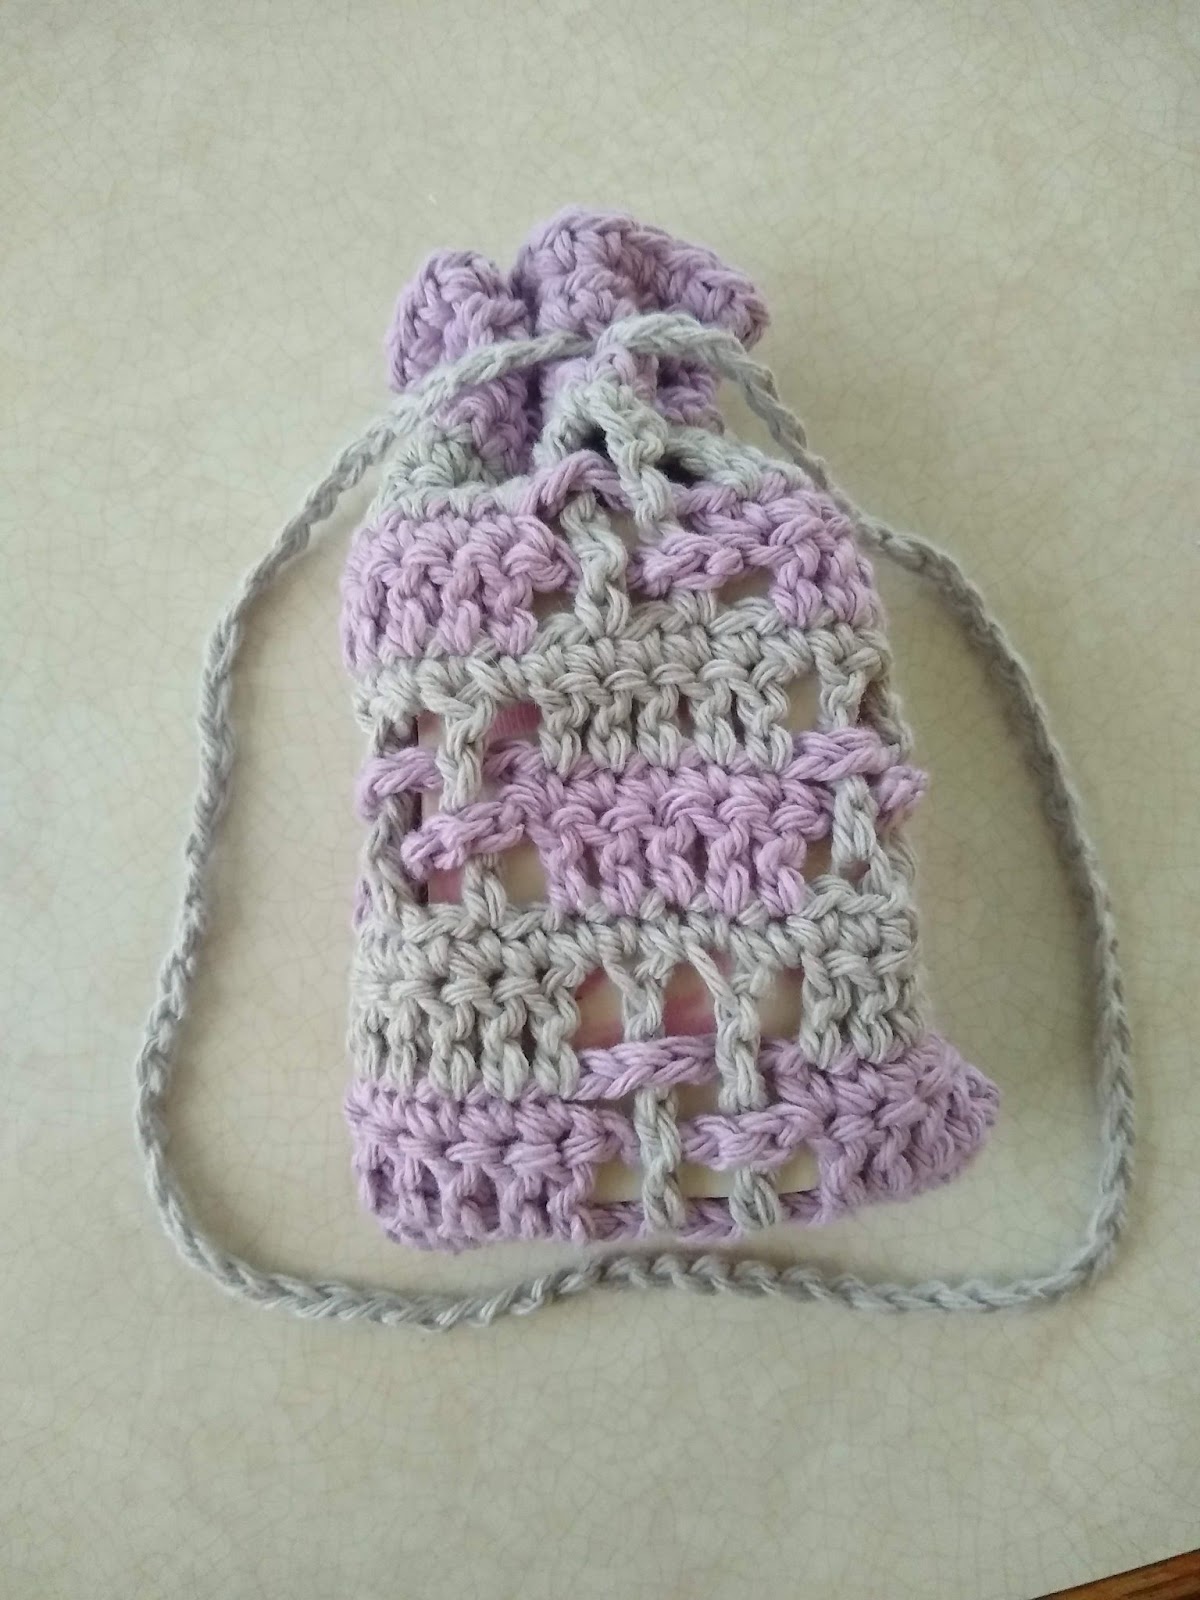
This pattern was created with the help of my daughter.  She likes soap from Buff City Soaps and wanted a larger soap sack.  She named it Double Dutch after the jump rope game because she thought the woven chains looked like jump ropes.  
I had a lot of fun designing this one, especially since I got to brainstorm with my daughter!  

This would make a perfect gift paired with handmade washcloths or facial rounds.  

The pattern below includes both photos and a video.  


Pin this pattern on Pinterest 

Place this pattern in your Ravelry Queue


Supplies:

Two colors of cotton yarn, weight 4

Color A = 28-30 yards

Color B = 15-18 yards

Crochet hook size H

Yarn needle


Abbreviations:

ch = chain

sc = single crochet

dc = double crochet

st = stitch

sts = stitches

dtr =double treble stitch

ch-sp

hdc = half double crochet


Notes:

  • If you are unfamiliar with dtr, here is a step-by-step tutorial.  

  • Chain stitches at the beginning of each row do not count as stitches.

  • Do not cut the yarn when changing colors, just carry the yarn up the side.

  • I used Premier Home Cotton yarn in colors lavender & pewter.


Pattern:


*Color A:


Ch 33


R1: sc in 2nd ch from hook, sc in each ch across (32 sts)


R2: ch 1, sc in each st across (32 sts)


R3: ch 2, dc in 1st st, [dc in 5 sts, ch 5, skp 5 sts] repeat, dc in last st (15 ch, 17 dc)


R4: ch 1, sc in 1st st, [ ch 5, skp 5 sts, sc in 5 sts] repeat, sc in last st (15 ch, 17 sc)


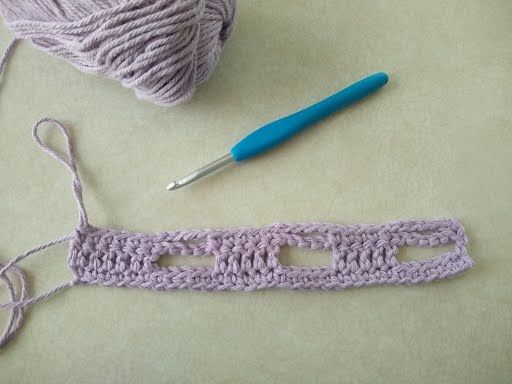
After the first four rows, it will look like this:

*Switch to color B: (See photos and video tutorial for R5 below.)


R5: ch 2, dc in 1st,  [dc in next 5 st, ch 1, dtr over ch from r4 under ch from r3 and into 2nd sc under the two 5-ch spot, ch 1, dtr under ch from r4 and over ch from r3 and into 4th sc under the two 5-ch spot, ch 1] repeat, dc in last st (17 dc, 6 dtr, 9 ch)  


R6: ch1, sc in each st and ch-sp (32 sc)


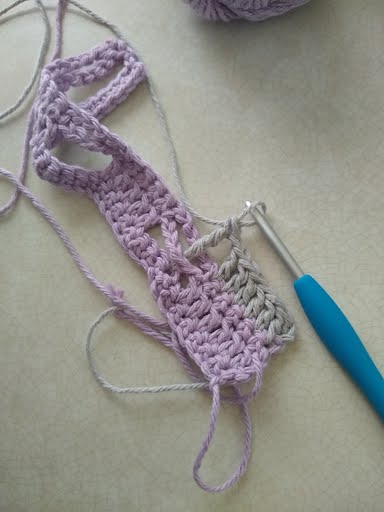
Row 5 tutorial photos.  

Push the top chain back, and the front chain forward and then go between them to stitch into the sc below.

(dtr over ch from r4 under ch from r3 and into 2nd sc under the two 5-ch spot)


Row 5 tutorial video. Video 

Push the top chain forward, the bottom chain back and go between them to stitch into the sc below.

(dtr under ch from r4 and over ch from r3 and into 4th sc under the two 5-ch spot)


Photo of after the first two dtr and next 1 dc
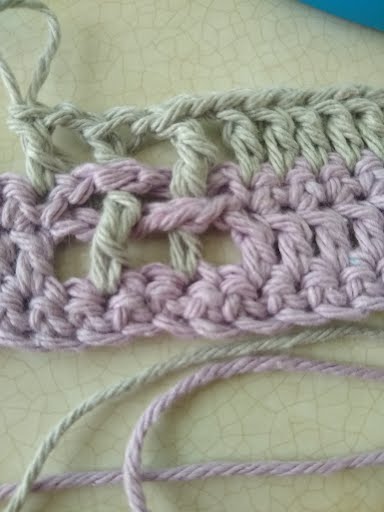

After row 6, it will look like this:


*Switch to color A:


R7: ch 2, dc in 1st st [ch 5, skp 5 sts, dc in 5 sts] repeat, dc in last st (15 ch, 17 dc)


R8: ch 1, sc in 1st st [sc in 5 sts, ch 5, skp 5 sts] repeat, sc in last st (15 ch, 17 sc)


*Switch to color B: 


R9: ch 2, dc in 1st st,  [ch 1, dtr over ch from r4 under ch from r3 and into 2nd sc under the two 5-ch spot, ch 1, dtr under ch from r4 and over ch from r3 and into 4th sc under the two 5-ch spot, ch 1, dc in next 5 st, ch 1,] repeat, dc in last st (17 dc, 6 dtr, 9 ch)


R10: ch1, sc in each st and ch-sp (32 sc)


*Switch to color A:


R11: Repeat R3


R12: Repeat R4


*Switch to color B:


R13: Repeat R5


R14: Repeat R6


*Switch to color A:


R15: ch 1, sc in each st (32 sc)


R16: ch2, hdc in first [ch 1, skp 1 st, hdc in next] repeat across hdc in last (15 ch-sp, 17hdc)


R17: ch 1, hdc in each st and ch-sp across (32 hdc)


R18: ch 1, sc in each st across (32 sc)

Cut tail 24” long. 


Weave in ends.  Use the long tail to seam the sides and bottom, right sides together.  Turn.  


Drawstring


Using color B 


ch 75


Weave the drawstring over and under through the chain spaces from R20.  Tie ends together securely, clip off excess yarn.  You will need to go between the 2 hdc at the seam in order for it to work out evenly.  


Happy Crafting
🧡 Grandma Duck 🧡

Don't miss any upcoming free patterns!
Subscribe to Grandma Duck Designs by Email

This pattern is for personal use only. 
It cannot be sold, redistributed, or edited in any way.
Copyright 2022, Grandma Duck Designs

Saturday, June 11, 2022

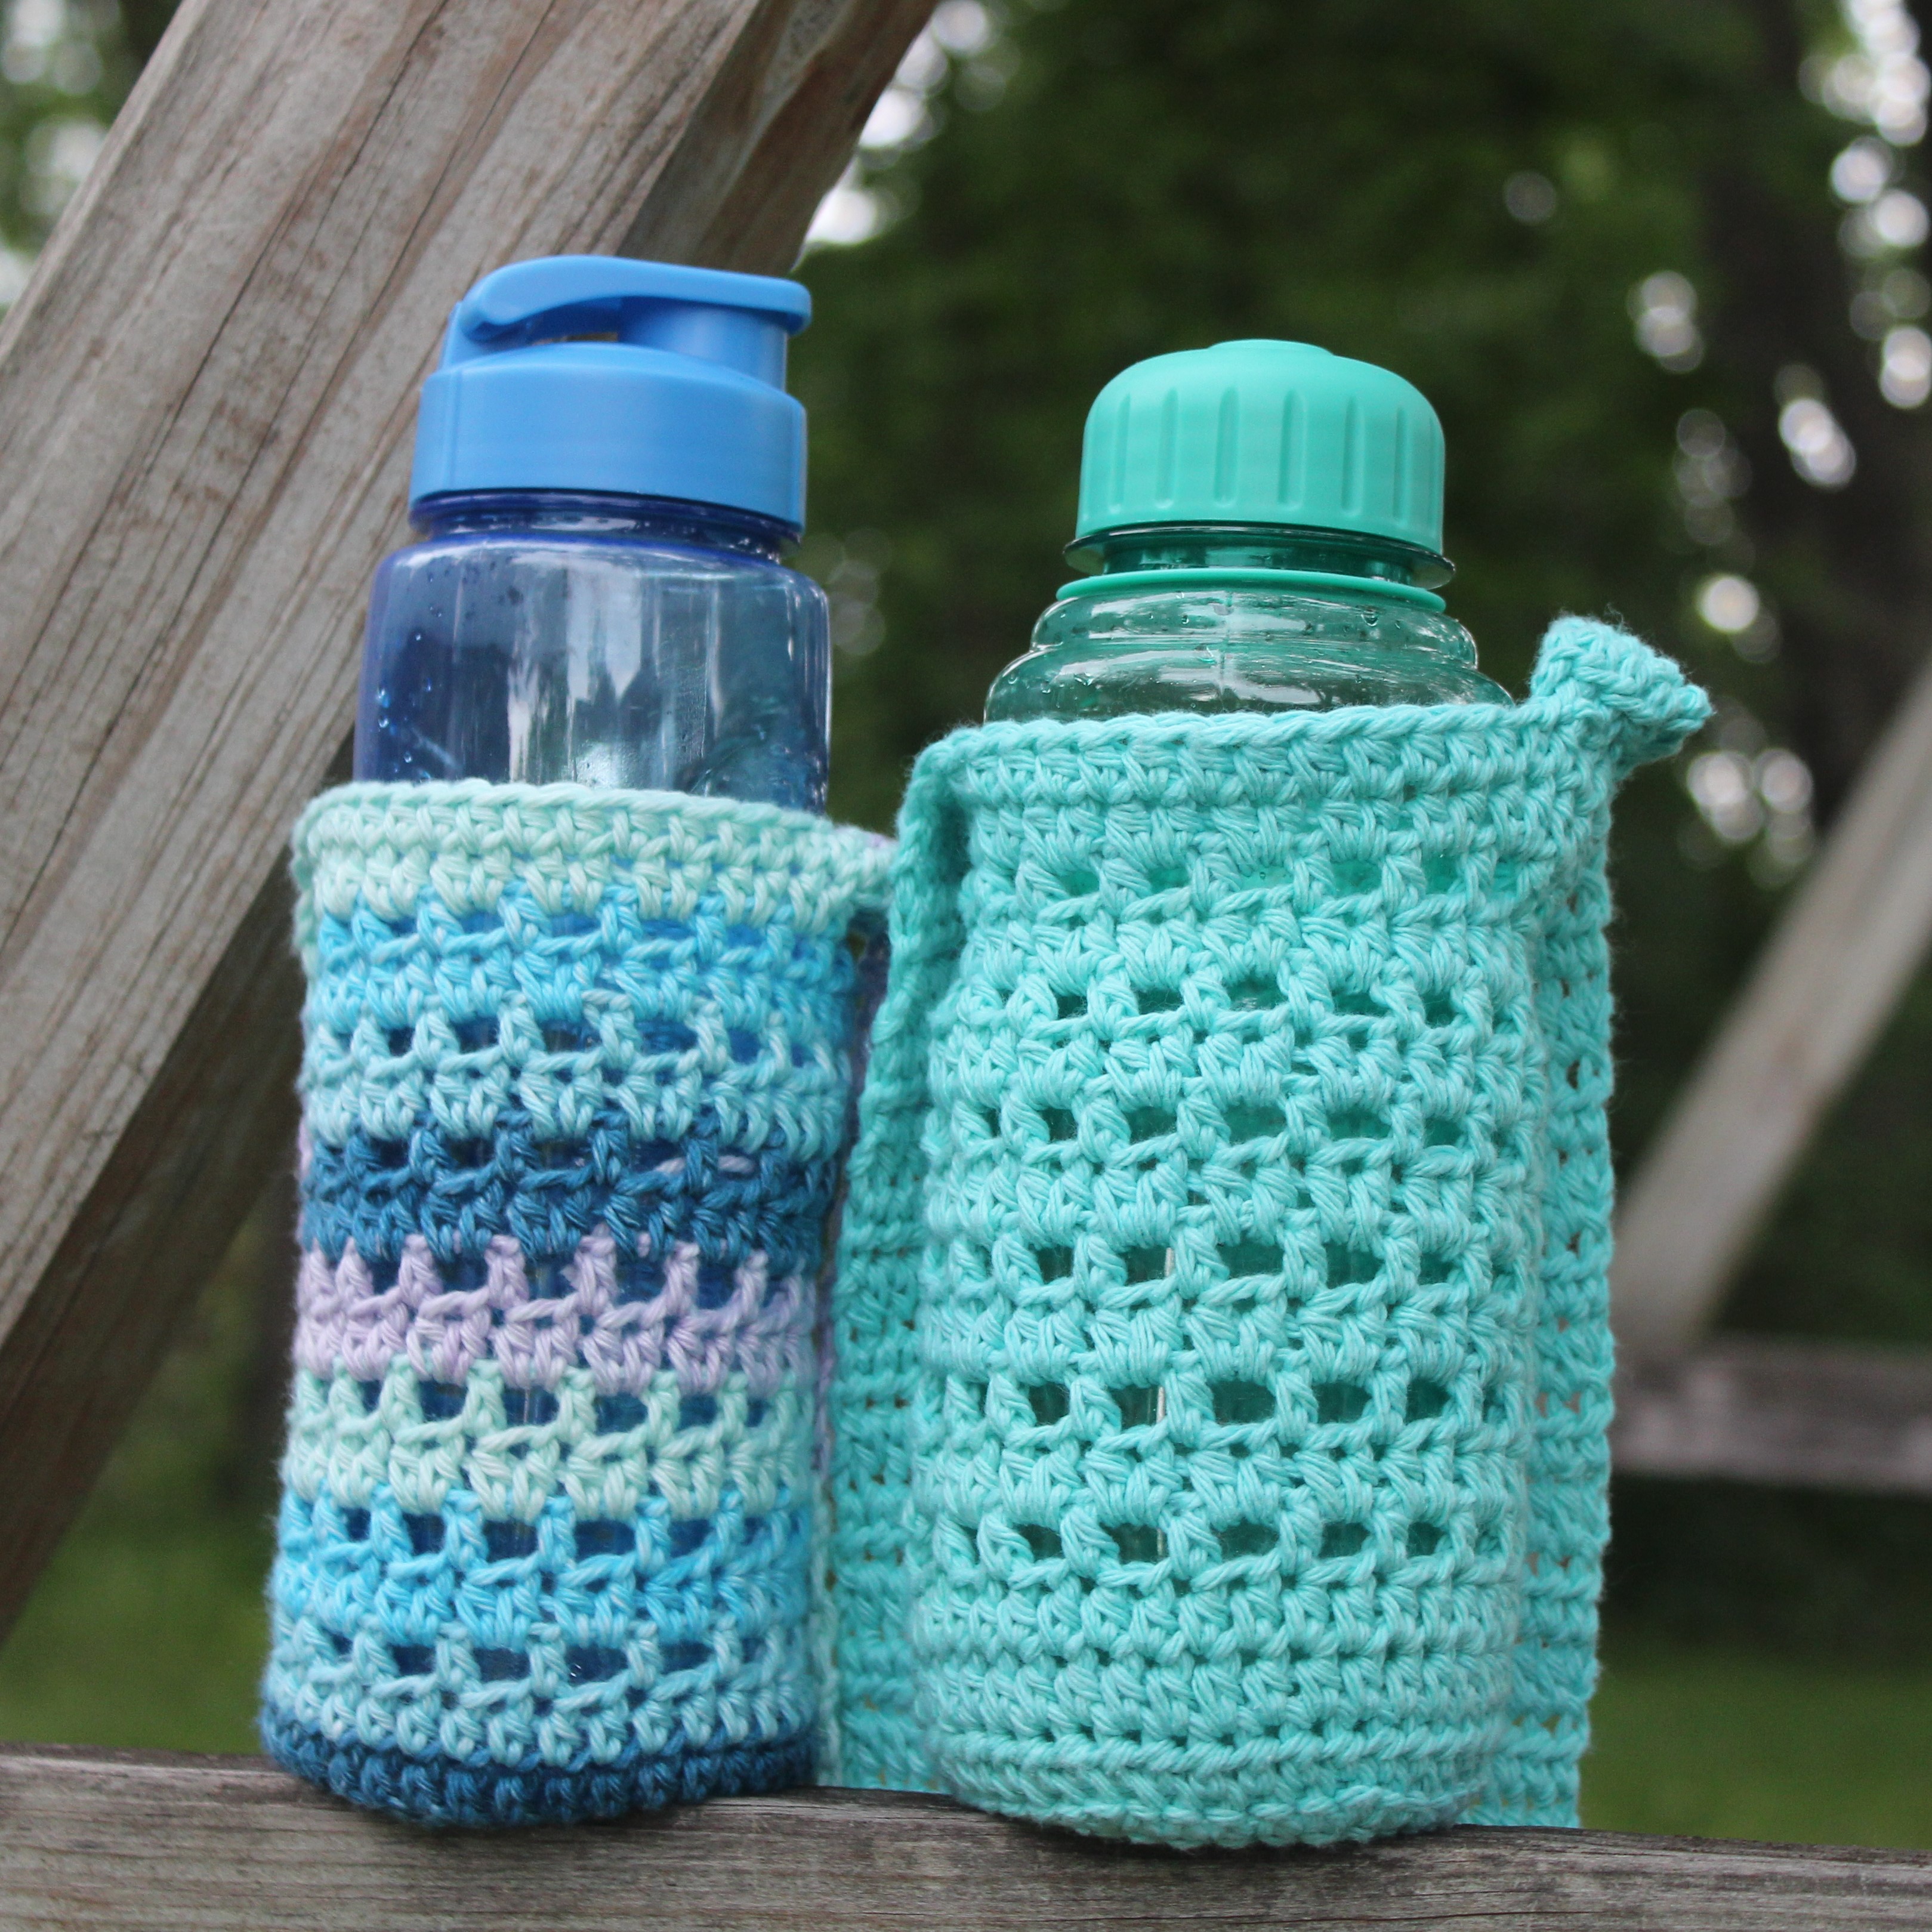
Willow River Water Bottle Holder

Keep your hands-free and yourself hydrated using this quick and easy-to-crochet water bottle carrier pattern.  It is a fun and practical accessory perfect for hiking, a trip to the beach, a day at the park, or other adventures!


My family has been spending more time than ever outdoors and we use water bottle carriers all the time.  It is a "must bring" item when we are away from home.  This pattern uses less than a skein of yarn and takes under two hours from start to finish.  


Add to your Ravelry Queue 

Pin on Pinterest 


Supplies:

  • Cotton yarn, 90-110 yards
  • Crochet hook size I
  • Yarn Needle

Abbreviations:

  • ch = chain
  • hk = hook
  • sc = single crochet
  • sl-st = slip stitch
  • hdc = half double crochet
  • blo = back loop only
  • sk 1 st = skip one stitch
  • ch-sp = chain space


Notes:

Chain stitches do not count as stitches unless indicated.

R1-22 are done in the round, do not turn work.


Willow River Water Bottle Holder

Bottom:

R1: ch 2, 6 SC in 1st ch, sl-st join (6 SC)

R2: ch 1, 2 SC in each st, sl-st join (12 SC)

R3: ch 1, [2SC in 1st st, 1SC in next] repeat around, sl-st join (18 SC)

R4: ch 1, [2SC in 1st st, 1SC in next 2] repeat around, sl-st join (24 SC)

R5:ch 1, [2SC in 1st st, 1SC in next 3] repeat around, sl-st join (30 SC)

R6: ch 1, [2SC in 1st st, 1SC in next 4] repeat around, sl-st join (36 SC)


Sides:

R7: ch2, 1 HDC BLO in each st, sl-st join (36 HDC)

R8: ch 2, HDC in each st, sl-st join (36 HDC)

R9: repeat R8

R10: ch 3 (counts as first HDC + ch1), sk 1 st, HDC in next, [ch 1, sk 1 st, HDC in next] repeat around, ch 1, sl-st join to 2ch from beginning ch3 (18 HDC, 18 ch-sp)

R11: ch 2, [2 HDC in each ch-sp] repeat around (36 HDC)

R12-R21 repeat [R10, R11] 

R22: ch 2, HDC in each st, sl-st join (36 HDC)


Handle

R1: ch 2, turn, HDC in first 4 st (4 HDC)

R2: ch 2, turn, HDC in each st (4 HDC)

Repeat R2 until the handle is desired length.  I did 98 rows for a cross-body version

Join handle to the opposite side using slip stitch join or your favorite method. 

Weave in ends.

Note: the handle can be done using only three HDC if you would prefer a narrower handle.

Option: You can repeat R10-R11 additional times to make the bottle carrier longer if desired.


Happy Crafting
🧡 Grandma Duck 🧡

Don't miss any upcoming free patterns!
Subscribe to Grandma Duck Designs by Email

This pattern is for personal use only. 
It cannot be sold, redistributed, or edited in any way.
Copyright 2022, Grandma Duck Designs


Friday, March 12, 2021

24 Baby Animal Blocks


These blocks were previously published on my blog, but I have heard from some people that it was hard to get the patterns.  Below you will find all 24 blocks.  

Pin the pattern set on Pinterest


Be sure to check out these other fun graphghan sets!  I have many other free graphghan patterns too!  

Camping (twenty-four 60x60 blocks)
Ocean/Beach (twenty-four 60x60 blocks)
ABC Blocks (twenty-six 24x24 blocks)
Number Blocks (ten 24x24 blocks)
Christmas (thirty 60x60 blocks)
Flower Garden (twenty-four 60x60 blocks)


Row 1: Duck, Cow, Fox, Rhino, Sheep, Frog

Row 2: Giraffe, Bear, Rabbit, Deer, Elephant, Lion

Row 3: Raccoon, Owl, Tiger, Hedgehog, Dog, Horse

Row 4: Cat, Chick, Pig, Zebra, Monkey, Hippo


If you make something using these designs, please tag me on social media or share a photo with me in the comments.  I love seeing my designs come to life!


Happy Crafting
🧡 Grandma Duck 🧡

Don't miss any upcoming free patterns!
Subscribe to Grandma Duck Designs by Email
This pattern is for personal use only. 
It cannot be sold, redistributed, or edited in any way.
Copyright 2019-2021, Grandma Duck Designs

Sunday, March 7, 2021

Lemon Peel Mesh Washcloth


Over the past two weeks, I have experimented with the traditional Lemon Peel stitch (alternating single crochet and double crochet.)  It is my favorite and most used stitch!  

This particular variation of the Lemon Peel Stitch, I name Lemon Peel Mesh.  It is my favorite so far!  This made a beautiful washcloth with just a bit of stretch.  


Here's a close up of the stitches


Add to your Ravelry Queue

Pin on Pinterest

Supplies:

  • Cotton yarn
  • Crochet hook size H or I
  • Yarn Needle
The yarn used in the samples is Peaches N Crème Stripey Quiet Dahlia Yarn.

Abbreviations:

  • ch = chain
  • hk = hook
  • sc = single crochet
  • dc = double crochet
  • hdc = half double crochet
  • blo = back loop only
  • flo = front loop only


Lemon Peel Mesh Washcloth or Dishcloth

Note: all sc are front loop only, all dc & hdc are back loop only

Foundation chain = 31 (or any odd number)

Row 1: sc in the 2nd ch from the hk, sc across

Row 2: ch 1, sc flo in first [dc blo in next, sc flo in next] repeat across, hdc blo in last stitch

Row 3: repeat row 2 until desired size

Final row: ch 1, sc in first, repeat across


Happy Crafting
🧡 Grandma Duck 🧡

Don't miss any upcoming free patterns!
Subscribe to Grandma Duck Designs by Email

This pattern is for personal use only. 
It cannot be sold, redistributed, or edited in any way.
Copyright 2021, Grandma Duck Designs


Saturday, December 26, 2020

Baby Bear Washcloth


One of the things I love to give to new moms is a set of baby washcloths.  I searched for a fun shaped washcloth but didn't find what I wanted so I decided to play around and see if I could create something fun.  This is just what I had in mind!  The variety of stitches creates a fun texture and the addition of the ears turns a drab washcloth into something fun!  

Be sure to read all the way to the bottom of the post for several variations.  I've included a variation that uses all double crochet if you want to skip the herringbone stitches.

If you are interested in square baby washcloths check out Tub Time Trio 2 and Tub Time Trio.    

Add to your Ravelry Queue 

Pin on Pinterest 


Yarn: 

18 - 21 yards of I Love This Cotton or any weight 4 Cotton Yarn

Hook: H


Abbreviations:

ch = chain

sl-st = slip stitch

dc = double crochet

her-dc = herringbone double crochet

hhdc = herringbone half double crochet

sts = stitches

tr = triple crochet

blo = back loop only


Note: Chain stitches do not count as a stitch.


Basic One Color Bear Washcloth Pattern:

R1: ch four, sl-st to join, ch 2, 13 dc into circle, sl-st to join. (Or use a magic circle to start.) (13 stitches)

R2: ch 3, 2 her-dc in each stitch, sl-st to join (26 stitches)

R3: ch 2, 2 dc in stitch, 1 dc in next [2dc in next, 1 dc in next] repeat around. Sl st to join (39 stitches)

R4: ch 2, 2hhdc, 1 hhdc in next 2 [2 hhdc in next, 1 hhdc in next 2] repeat around, sl-st to join (52 stitches)

R5: ch 1, sk 2 sts, 9 tr in next, sk 2 sts, sl-st in next 6, sk 2 sts, 9 tr in next, sk 2 sts, sl-st around.


Variation: Outline

Follow the instructions above for R1, R2, R3, R4.  Switch to Outline color for R5.


Variation: Blue

R1, R4, R5 in color 1 (blue)

R2, R3 in color 2 (tan)


Variation: Double Crochet Pink 1

Color 1 R1, R5 (pink)

Color 2 R2, R3, R4 (tan)

R1: Ch four, sl-st to join, ch 2, 13 dc into circle, sl-st to join. (Or use magic circle to start.) (13 stitches)

R2: ch 3, 2 dc blo in each stitch, sl-st to join (26 stitches)

R3: ch 2, 2 dc in stitch, 1 dc in next [2dc in next, 1 dc in next] repeat around. Sl st to join (39 stitches)

R4: ch 2, 2dc, 1 dc in next 2 [2 dc in next, 1 dc in next 2] repeat around, sl-st to join (52 stitches)

R5: ch 1, sk 2 sts, 9 tr in next, sk 2 sts, sl-st in next 6, sk 2 sts, 9 tr in next, sk 2 sts, sl-st around.


Variation Double Crochet Pink Outline 2:

Follow the pink variation above with the following changes.  R1-R5 in tan.  R2 regular dc not blo

R6: sl-st outline around in pink


Email: grandmaduckdesigns@gmail.com

Pinterest: Grandma Duck Designs
Raverly: Grandma Duck Designs
Instagram: Grandma Duck Designs
Facebook: Grandma Duck Designs


Happy Crafting
🧡 Grandma Duck 🧡

Don't miss any upcoming free patterns!
Subscribe to Grandma Duck Designs by Email

This pattern is for personal use only. It cannot be sold, redistributed, or edited in any way.
Copyright 2020, Grandma Duck Designs


Monday, October 19, 2020

Grape Lemonade Baby Blanket


This fun baby blanket has it all!  It is beautifully textured, uses soft yarn, and is easy to make.  Oh, and did I mention that it is also quick?  This blanket was completed in about 8-10 hours!  

I have again used one of my all-time favorite stitches, Lemon Peel.  If you love the lemon peel stitch as much as I do, check out the Lumpy Lemonade Dishcloth or the Northern Lights Winter Scarf.  


Ravelry and Pinterest links coming soon.   

Supplies:
Bernat Baby Blanket main color: approximately 430 yards (six 3.5 oz skeins)
Bernat Baby Blanket Yarn, stripe and border: approximately 100-120 yards
12mm hook
Yarn Needle
Scissors
Stitch Markers

Abbreviations:


ch = chain
sl-st = slip stitch
sc = single crochet
dc = double crochet
st = stitch
sts = stitches
ch-sp = chain space
hk = hook

Finished size = 35" x 38"

Notes:
  • Chain stitches do not count as a stitch
  • I used a 12mm hook, but I crochet tightly.  If you crochet loose, consider dropping down a hook size.
  • Gauge is not important.
  • Mark your ch-sp in each corner with a stitch marker.  This makes it easier to find!
  • To adjust the size of your blanket, start with an odd number of chains.  

Instructions:

Blanket:

With main color ch 61
Row 1: sc in 2nd ch from hk and in each ch across (60 sts)
Row 2: sc in first st [dc in next, sc in next] repeat, hdc in last st, ch 1
Rows 3-5; repeat row 2

Switch to color 2:
Rows 6-9: repeat row 2

Switch to main color:
Rows 10-13: repeat row 2

Switch to color 2:
Rows 14-17: repeat row 2

Switch to main color:
Rows 18 - 55: repeat row 2.  

Border : 
Switch to color 2
Round 1: ch 1, sc in each stitch around, place [sc-ch-sc] at each corner, sl-st to join; 
Round 2 - 3: repeat round 1 placing [sc-ch-sc] in the ch-sp from the previous round.  

If you make a blanket, please tag me on social media or share a photo with me in the comments.  I love seeing my designs come to life!


Email: grandmaduckdesigns@gmail.com
Pinterest: Grandma Duck Designs
Raverly: Grandma Duck Designs
Instagram: Grandma Duck Designs
Facebook: Grandma Duck Designs


Happy Crafting
🧡 Grandma Duck 🧡

Don't miss any upcoming free patterns!
Subscribe to Grandma Duck Designs by Email

This pattern is for personal use only. It cannot be sold, redistributed, or edited in any way.
Copyright 2020, Grandma Duck Designs

Friday, June 19, 2020

Freshly Squeezed Lemonade Dishcloth


It's summer, so I'm dreaming of a freshly squeezed glass of lemonade.   OK, truthfully the name for this dishcloth came about from the stitches used: lemon peel stitch and crossed double crochet.  The crossed double crochet stitches look like they are squeezed together.  Don't you just love the texture from the Lemon Peel stitch?  It is my favorite!  The crossed double crochet border really highlights the beautiful center.  

This pattern is easy to make yet looks complex.  Win, win!  

If you love the lemon peel stitch as much as I do, check out the Lumpy Lemonade Dishcloth or the Northern Lights Winter Scarf.  


Place this pattern in your Ravelry Queue 
Pin this pattern on Pinterest 

Supplies:
Cotton yarn, approximately 70-80 yards
Size H or I hook
Yarn Needle
Scissors

Abbreviations:
ch = chain
sl-st = slip stitch
sc = single crochet
dc = double crochet
st = stitch
sts = stitches
hk = hook
xdc = crossed double crochet  (see instructions below)

Special Stitch:
xdc = Crossed double crochet.  To make xdc, sk 1 dc, dc in next, go back and dc in skipped st.

Notes:
-Chain stitches do not count as a stitch, except where noted
-I use an H with I Love This Cotton and Premier Home and an I hook with Peaches & Creme.
-Gauge is not important.

Instructions:

Lemon Peel Center:
ch 23
Row 1: sc in 2nd ch from hk and in each ch across (22 sts)
Row 2: sc in first [dc in next, sc in next] repeat, hdc in last st
Rows 3-18; repeat row 2 until square

Border 1: 
ch 1, sc in each stitch around, place [sc-ch-sc] at each corner, sl-st to join;  placing 20 stitches evenly along the sides.  Mark the ch sp each corner with a stitch marker.

Border 2: 
ch 3 (counts as a stitch) 3 dc in ch sp, dc in sc, [10 xdc (side), dc in next, 3dc in next, dc in next (corner)] repeat, sl-st to join.  There will be 10 xdc on each side and dc-3dc-dc at each corner

Border 3:
ch1, sc in each st, place [sc-ch-sc] into the middle dc in each corner from the previous round, sl-st to join

Construction Notes:
-The Lemon Peel stitch center ends with a hdc in each row.  This keeps the dishcloth square.  
-On my two samples, I needed 18 rows on one and 19 rows on the other to make the center square.
-Border 1: I use stitch markers to mark the ch spaces at each corner to help place the dc stitches in the next round.  
-Border 2:  The sc-ch-sc at each corner will have a dc, 3dc, dc above.

Close Up View of Corner


If you make a dishcloth, please tag me on social media or share a photo with me in the comments.  I love seeing my designs come to life!

Email: grandmaduckdesigns@gmail.com
Pinterest: Grandma Duck Designs
Raverly: Grandma Duck Designs
Instagram: Grandma Duck Designs
Facebook: Grandma Duck Designs


Happy Crafting
🧡 Grandma Duck 🧡

Don't miss any upcoming free patterns!
Subscribe to Grandma Duck Designs by Email

This pattern is for personal use only. It cannot be sold, redistributed, or edited in any way.
Copyright 2020, Grandma Duck Designs


Saturday, June 13, 2020

Ferris Wheel Coasters


This coaster pattern is quick, yet it turns out so pretty!  Originally I wanted to make a fancier looking facial round (and yes, you could use this as a face scrubbie) but my friends told me that this was much too pretty for a facial round that instead, it needed to be a coaster.  

If you like the look of this, be sure to check out the Ferris Wheel Dishcloth pattern for a beautiful round dishcloth.

Place this pattern in your Ravelry Queue
Pin this pattern on Pinterest 

Supplies:
Cotton yarn, approximately 6 yards
Size H or I hook
Yarn Needle
Scissors

Abbreviations:
ch = chain
sl-st = slip stitch
dc = double crochet
blo = back loop only
st = stitch
sts = stitches

Notes:
-Chain stitches do not count as a stitch.
-I use an H with I Love This Cotton and Premier Home and an I hook with Peaches & Creme.
-Gauge is not important.

Instructions:

Ch 4, sl-st to join or use the magic circle

Round 1: ch 2, 12 dc into ring, sl-st to join (12 stitches)

Round 2: [Every other is blo] ch 2, 2dc into first st, 2dc blo into next st,{2 dc into next st through both loops, 2dc blo into next st} sl-st to first dc to join (24 stitches)

Round 3: [All stitches blo]  ch 2,  2hdc into first st, 1hdc blo into next st,{2 hdc blo into next st, 1hdc blo into next st} sl-st to first dc to join (36 stitches)

Round 4 - decorative edge: ch 3, skip 1 st, sl-st in next {ch 3, sk 1 st, sl-st in next} repeat around.

If you make one or a set of these coasters, please tag me on social media or share a photo with me in the comments.  I love seeing my designs come to life!

Email: grandmaduckdesigns@gmail.com
Pinterest: Grandma Duck Designs
Raverly: Grandma Duck Designs
Instagram: Grandma Duck Designs
Facebook: Grandma Duck Designs


Happy Crafting
🧡 Grandma Duck 🧡

Don't miss any upcoming free patterns!
Subscribe to Grandma Duck Designs by Email

This pattern is for personal use only. It cannot be sold, redistributed, or edited in any way.
Copyright 2020, Grandma Duck Designs


Saturday, May 30, 2020

Snippets & Scraps Flower Facial Rounds


Welcome to the fourth part of my series - Snippets & Scraps.  If you missed the other three you can find them here: Snippets & Scraps #1Snippets & Scraps #2 and Snippets & Scraps #3.   It has been so fun to come up with ideas to use cotton yarn scraps!  

I love how these flowers looked paired with one of the other Snippets & Scraps patterns.  Wouldn't it make a cute spa set for a gift or to keep for yourself?  These pretty flowers would also make a fantastic baby washcloth!  I gave one to my granddaughter for her to wash her face and she loves it.  It would also make a pretty coaster.  

Do you use cotton facial rounds/facial scrubbies?  I really like using them in the evening to wash up before bed.  I have a stack in a pretty glass jar in my bathroom.  If you are looking for patterns for other facial rounds, try Herringbone Facial Rounds or Fairy Rings Face Scrubbies

Flower Facial Rounds
Pin this pattern on Pinterest 
Place this pattern in your Ravelry Queue 

Supplies:
Cotton Yarn about 25 yards
Crochet Hook - size H or I or the size you are most comfortable using with cotton yarn
Scissors
Yarn Needle

Abbreviations:
ch = chain
sl-st = slip stitch
dc=double crochet
sc = single crochet
BLO = back loop only
sk = skip
st = stitch
sts = stitches

Notes:
ch 3 at the beginning of each round does not count as a stitch throughout all patterns.
There are four design options.  


Option 2 and Option 1

Option 1: All one yarn

ch 4, sl-st to join or use magic circle
Round 1: ch 3, 12 dc in circle, sl-st to join (12 sts)
Round 2: ch 3, 2dc in each st, sl-st to join (24 sts)
Round 3: ch 3, 1 dc in same stitch, 2dc in next [1 dc, 2dc in next] repeat around, sl-st to join (36 sts)
Round 4: sl-st in next st, sk 1, 5dc in next, sk 1 [sl-st in next, sk 1 st, 5 dc in next, sk 1 st] repeat around, sl-st to join (45 dc, 9 sl-st)

Option 2: Two yarns - flower center and flower petals

Using yarn A:
ch 4, sl-st to join or use magic circle
Round 1: ch 3, 12 dc in circle, sl-st to join (12 sts)
Round 2: ch 3, 2dc in each st, sl-st to join, secure end and weave in (24 sts)

Using yarn B
Round 3: sl-st to join B, ch 3, 1 dc BLO in same stitch, 2dc BLO  in next [1 dc BLO, 2dc BLO in next]  repeat around, sl-st to join (36 sts)
Round 4: sl-st in next st, sk 1, 5dc in next, sk 1 [sl-st in next, sk 1 st, 5 dc in next, sk 1 st] repeat around, sl-st to join (45 dc, 9 sl-st) 


Option 3 and Option 1

Option 3: Two or three yarns - flower center, flower petals, and outline

Using yarn A:
ch 4, sl-st to join or use magic circle
Round 1: ch 3, 12 dc in circle, sl-st to join (12 sts)
Round 2: ch 3, 2dc in each st, sl-st to join, secure end and weave in (24 sts)

Using yarn B:
Round 3: sl-st to join B, ch 3, 1 dc BLO in same stitch, 2dc BLO  in next [1 dc BLO, 2dc BLO in next] repeat around,  sl-st to join (36 sts)
Round 4: sl-st in next st, sk 1, 5dc in next, sk 1 [sl-st in next, sk 1 st, 5 dc in next, sk 1 st] repeat around, sl st to join (45 dc, 9 sl-st)  secure end and weave in

Using yarn C or A:
Round 5: sl-st to join C, [sl-st in next] repeat around, sl-st to join


Option 4: Two yarns - flower with one yarn, coordinating yarn outline (not pictured)

Using Yarn A:
ch 4, sl-st to join or use magic circle
Round 1: ch 3, 12 dc in circle, sl-st to join (12 sts)
Round 2: ch 3, 2dc in each st, sl-st to join (24 sts)
Round 3: ch 3, 1 dc in same stitch, 2dc in next [1 dc, 2dc in next] repeat around, sl-st to join (36 sts)
Round 4: sl-st in next st, sk 1, 5dc in next, sk 1 [sl-st in next, sk 1 st, 5 dc in next, sk 1 st] repeat around, sl st to join (45 dc, 9 sl-st) secure end and weave in

Using yarn B:
Round 5: sl-st to join B, [sl-st in next] repeat around, sl-st to join


Happy Crafting
🧡 Grandma Duck 🧡

Don't miss any upcoming free patterns!
Subscribe to Grandma Duck Designs by Email

Email: grandmaduckdesigns@gmail.com

This pattern is for personal use only. It cannot be sold, redistributed, or edited in any way.
Copyright 2020, Grandma Duck Designs